
Contact management of the IP phone mainly includes:
- Local contacts
- Blacklist
- LDAP
Set up local contacts for IP phones
Local contacts can save the contact’s name, internal extension number, mobile phone number, and other information. IP phone supports saving 1000 local contacts and 10 contact groups (including default groups). It supports operations such as adding groups, editing, setting ringtones, setting accounts, and editing contacts.
Add a group of IP Phone
– Add group via phone
1. Press the soft key Dir -> AddGrp.
2. Fill in the group name
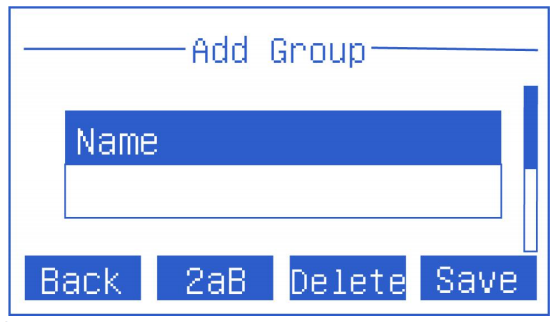
3. Press the Save soft key to save the group.
– Add a group via a web browser
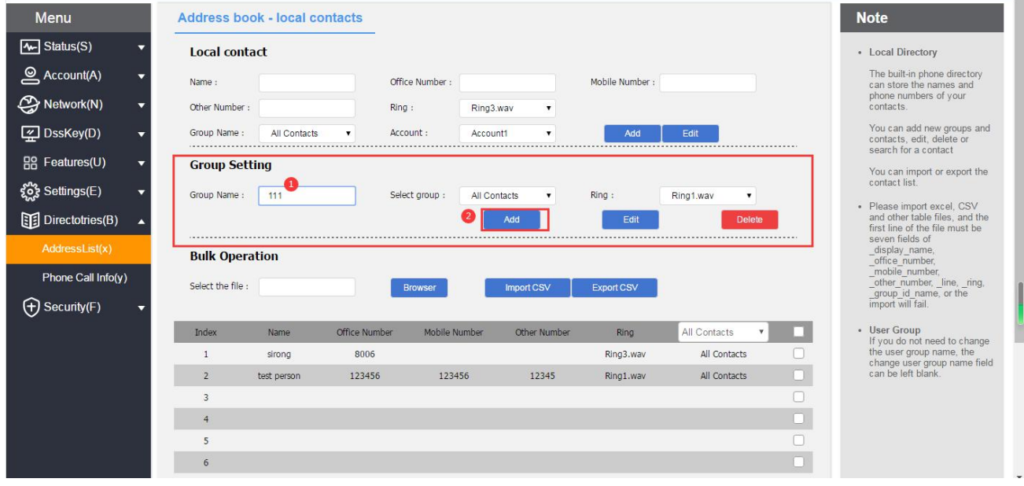
1. Log in to the phone page by IP address.
2. Click Directories(B)->Address list(x).
3. Enter the group name in the group name box.
4. Click the Add button to add a group.
Edit group of VoIP Phone
– Edit group via phone (default group cannot be edited)
1. Press DIR soft key.
2. Press  to select the group name.
3. Press the soft key Option -> Details to enter the editing interface.
4. Enter the new group name in the group name edit box (only English can be input on the phone interface).
5. Press the Save soft key to save the group.

– Edit group name via a web browser (default group cannot be edited)
1. Log in to the phone page by IP address.
2. Click Directories(B)->Address list(x).
3. Select a group.
4. After the selection, the selected group becomes an input mode, modify it to the name to be changed.
5. Click the Edit button to make changes.

Delete Group for IP telephone
– Delete group via phone (default group cannot be deleted)
1. Press Dir soft key.
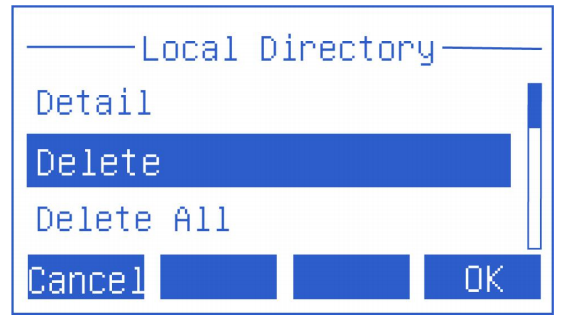
2. Press to select the group needed to delete.
3. Press the Option soft key.
4. Press to select the Delete option.
5. Press Delete to delete the group.
If you want to delete all contacts, press Option->Delete All.
– Delete group via a web browser (default group cannot be deleted)
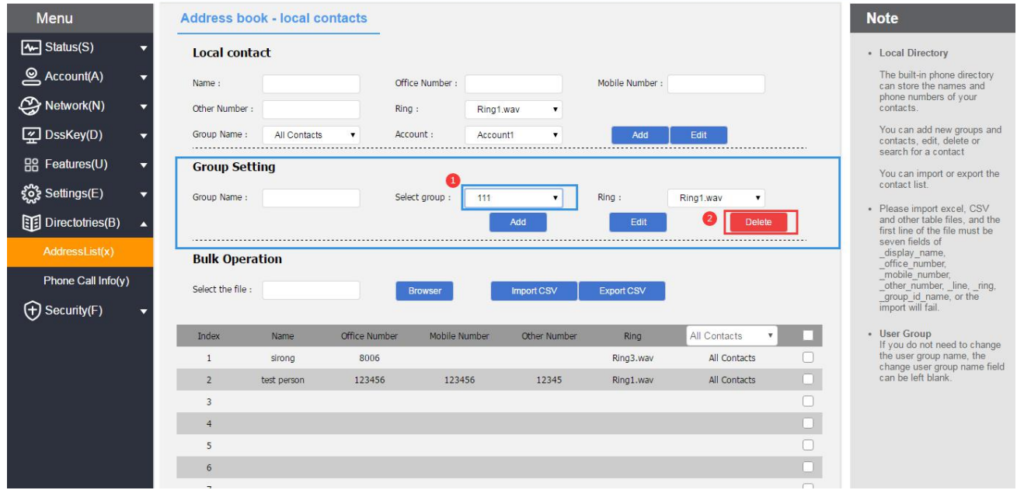
1. Log in to the phone page by IP address.
2. Click Directories(B)->Address list(x).
3. Select a group in the group module.
4. Click the delete button of the group setting module to delete.
Add contact IP telephone
There are three ways of adding contact:
- Manually add
- Batch import
- Add from call record
– Add contacts via the phone user interface
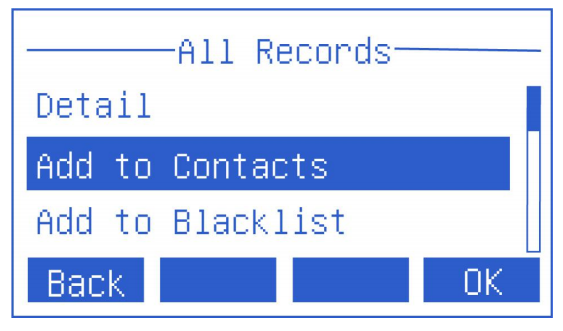
1. Press the History soft key in standby mode
2. Press to select the number needed to add to the contact.
3. Press the soft key Option-> Add to contacts.
4. Press to complete contact information (name, group, Mobile number,
Office number, Other numbers, Ring, Account, etc.).
5. Press Save soft key to save the contact.
– Add contacts via local contacts on the phone interface
1. Press the Dir soft key on the standby interface (or press Menu->Directory->Local Directory)
2. Press to select the group entering.
3. After entering the group, press the Add soft key to enter the add interface
4. Press to fill in the contact information (Name, mobile number, office number, another number, ring, account, group, etc. Can switch to another group.)
5. Press the Save soft key to save the contact.

– Add contacts via a web browser
1. Log in to the phone page by IP address
2. Click Directories(B)->Address list(x)
3. Fill in the contact information in the local contact module.
4. Click the Add button of the local contact module to add.

– Import contacts in bulk via web browser
1. Log in to the phone page by IP address.
2. Click Directories(B)->Address list(x).
3. Batch operation module click on CSV format to export contact templates.
4. Add/edit contact information in the table
5. Batch operation module Click Browse to find the CSV file you want to import, click CSV format import to add contacts
(Currently only supports importing xls, csv, xlsx file types)
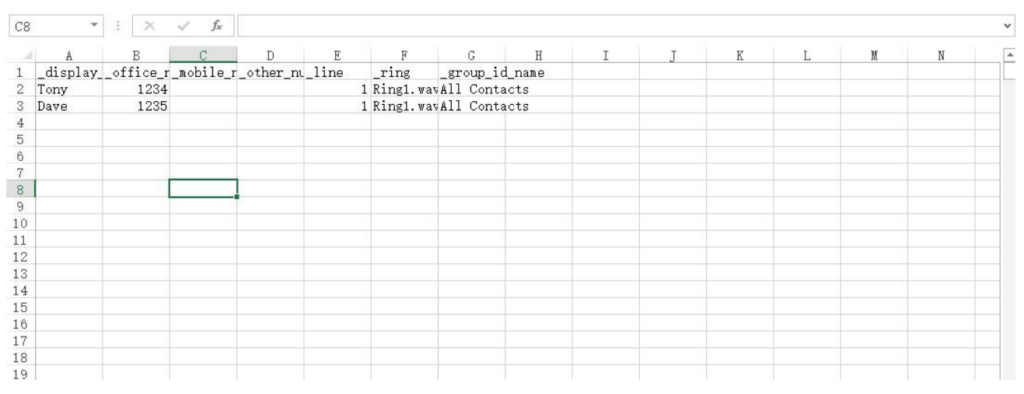
After clicking Import, the following prompt will appear:

IP Telephony Edit contact
– Edit contacts via the phone interface
1. Press the Dir soft key in standby mode (or Menu -> Directory -> Local Directory)-> All Contacts.
2. Press to select the person name needed to be edited.
3. Press soft key option-> details, and enter into the edit page of the contact.
4. Press to edit the contact information.
5. Press OK to save the editing operation.

– Edit contacts via a web browser
1. Log in to the phone page by IP address.
2. Click Directories(B)->Address list(x).
3. Click the contact you want to edit in the contact list below, and the information will
be filled in the local contact module.
4. Modify the contact information in the local contact module.
5. Click the Edit button to save the editing operation.

Delete contact on IP phone
– Delete contact via the phone user interface
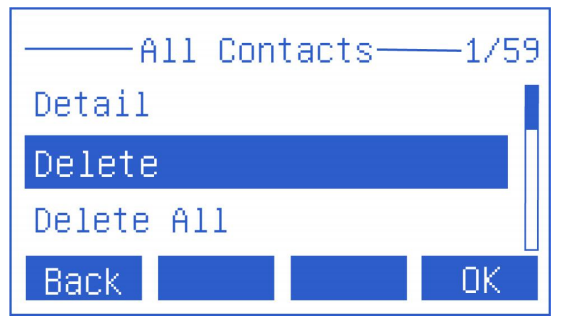
1. Press the Dir soft key in standby mode (or Menu -> Direcorty -> Local Directory) ->All Contacts.
2. Pressor to select the name of the contact you want to delete.
3. Press Option ->Delete/Delete all.
4. Press the OK soft key to confirm the action.
– Delete contacts via web browser
1. Log in to the phone page by IP address.
2. Click Directories(B)->Address list(x).
3. Tap the contact you want to delete in the contact list below.

4. Click the Delete/Delete all button under the list to delete the contact.
Note: The deleted contact cannot be recovered. Confirm whether you want to delete it before deleting it.
VoIP phone Call Contact
– Call a local contact through the IP phone interface
1. Press the Dir soft key in standby mode (or Menu -> Directory -> Local Directory) ->All Contacts.
2. Press to select the name of the contact you want to call.
3. Press the Send soft key to enter the contact number list.
4. Press to select the number you want to call to make a call. (mobile number or office number).
5. Press the Send soft key to make a call.

VoIP Phone Blacklist
IP Phone can save up to 30 blacklisted contacts, and the phone numbers blacklisted will be automatically rejected by the phone.
Add to blacklist
– Add a blacklist through the phone interface
1. Press the soft key Menu in standby mode -> Directory-> Local Directory ->Blacklist -> Add.
2. Press to edit blacklist information (name, mobile phone number, other numbers, account, etc. ).
3. Press the Save soft key to save changes to the blacklist members.

– Add a blacklist through the phone CDR interface
1. Press the History soft key in standby mode.
2. Press to select the number added to the blacklist.
3. Press soft key Option-> Add to blacklist.
4. Complete blacklist member information.

Delete blacklist
– Delete the blacklist through the phone interface
1. In standby mode, press the soft key Menu -> Directory ->Local Directory-> Blacklist.
2. Press to select the blacklist members to be deleted.
3. Press Option->Delete/Delete all.
4. Press the OK soft key to delete.

– Delete the blacklist through a web browser
1. Log in to the phone page by IP address.
2. Click Directories(B)->Address list(x).
3. Select the blacklist from the drop-down box of the contact list below (BlackList) .
4. Check the blacklist to be deleted.
5. Click the Delete/Delete All button under the list to delete the blacklist.

IP telephony LDAP configuration
Function Description
LDAP (Light Directory Access Protocol, Lightweight Directory Access Protocol) is an application layer protocol running on an IP network that provides a series of functions for accessing and maintaining distributed directory information services. Simply put, LDAP is a fast way to get centralized static data about people or resources. LDAP is most useful for information stored in this way: data needs to be read from different locations but does not need to be updated frequently. LDAP is very effective for storing the phone book and organization chart of company employees, and it is especially convenient for querying information.
For example: According to the tree structure, the root of the tree is the company name, and each department can be logically branched underneath, and each employee can be branched out under the department, and contacts can be retrieved within a certain range according to specific rules, such as the name of a company’s hardware department. Including “J” employees, etc.
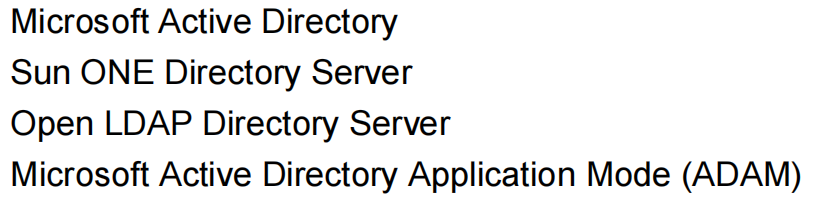
You can configure the phone to connect to an LDAP server that supports LDAPv2 or LDAPv3. The phone supports the following LDAP servers:
The biggest advantage of LDAP is that users can quickly find contacts from the LDAP server, without the need to maintain a local phone book. The contact information returned by the LDAP server is read-only. Users can call LDAP contacts but cannot add, edit or delete LDAP contacts. The administrator can configure LDAP query filter conditions on the phone, such as the number of contacts displayed, the information returned, and how to sort contacts. How to perform LDAP search on the SIP-T780 series IP phone:
Directly enter the search content on the pre-dial/dial interface (make sure that LDAP is enabled for the outgoing contact matching list), and the phone will query from the LDAP server. If there is a result, it will be displayed on the LCD interface, and the user can select a contact and initiate a call.
Press the LDAP programmable button or press Menu->Contacts->LDAP, and enter the content to be searched in the LDAP search interface. The phone will query the relevant contacts from the LDAP server and display them on the LCD interface. The user can select one Contact and initiate a call, or add the contact to the local address book or blacklist.
The phone sends a search request to the LDAP server. The LDAP server searches for all contacts based on the entered search content and configured filter conditions and then returns the matching results to the phone.
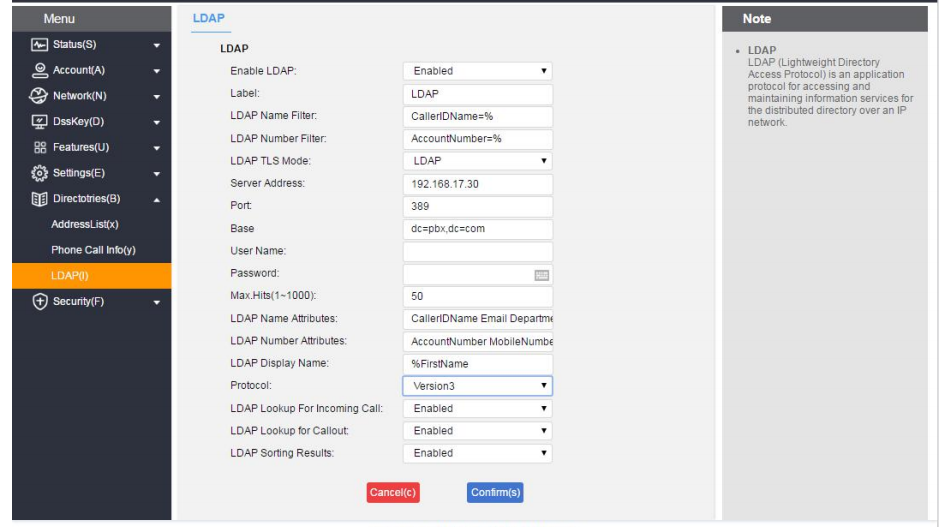
Configure the LDAP server for IP phones
The following example is for reference only. You can modify the LDAP attribute value according to your specific needs.
1. Open the web interface and log in.
2. Click Directories(B)->LDAP(I).
3. Configure LDAP parameters as follows:
Search LDAP contacts through the address book
1. Log in to the phone web interface, and click Directories(B)->LDAP.
2. Enable LDAP address book.
3. Click Confirm(s).
– Search LDAP contacts.
1. Click Menu->Directory->LDAP.
2. Input the name or number of the contact, the contact information that meets the search criteria will be displayed on the screen.
3. Press to select the contact.
4. Press the Call soft key, and make a call
CDR (call history) management
The call history of IP Phone includes dialed numbers, missed calls, and received calls. Each record supports up to 300 records.
You can view, delete, add contacts, and add blacklists to the dialog list. For contact operations, please refer to the chapter on contact management.
– View the call history through the phone interface
1. Press the History soft key, the number list displayed on the LCD screen is the recent call record.
2. Press select the call record.
3. Press the soft key Option -> Detail. You can view the details of the record.

– View CDRs via a web browser
1. Log in to the phone page by IP address.
2. Click Directories(B)->Phone call info(y).

– Make a call from the CDRS
1. Press the History soft key when the phone is on standby.
2. Press to select the number going to call.
3. Press Send soft key to make a call.