HOPEIKER Small Group VoIP Phone System
Small Group Phone System
Hopeiekr IP PBX800 is a customized embedded IP telephone system for small and medium-sized enterprises. IP PBX800 combines PSTN line (telecom line) and VoIP network perfectly, which not only controls the communication cost-efficiently but also ensures users keep the call uninterrupted in case of power failure or network interruption and use the phone system more stably.PBX 800 is also a converged implementation solution, i.e. combining the application of VoIP technology on the traditional telephone system, which is ideal for VoIP applications such as long-distance telephone bypass, PBX interconnection, and expansion for small and medium-sized enterprises/branches.
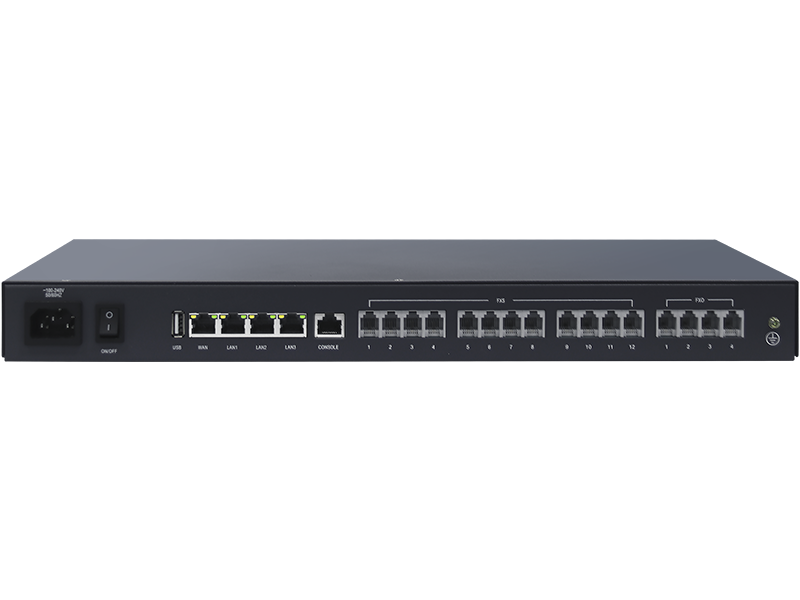
Some of the benefits of IP PBX 800 products
Small group telephone system with high stability and reliability; high compatibility; easy maintenance, easy management, etc…
Easy to use of IP PBX
Step 1: Port flexible configuration
The modules can be matched according to the different needs of customers to better meet their needs. Physical Connection :
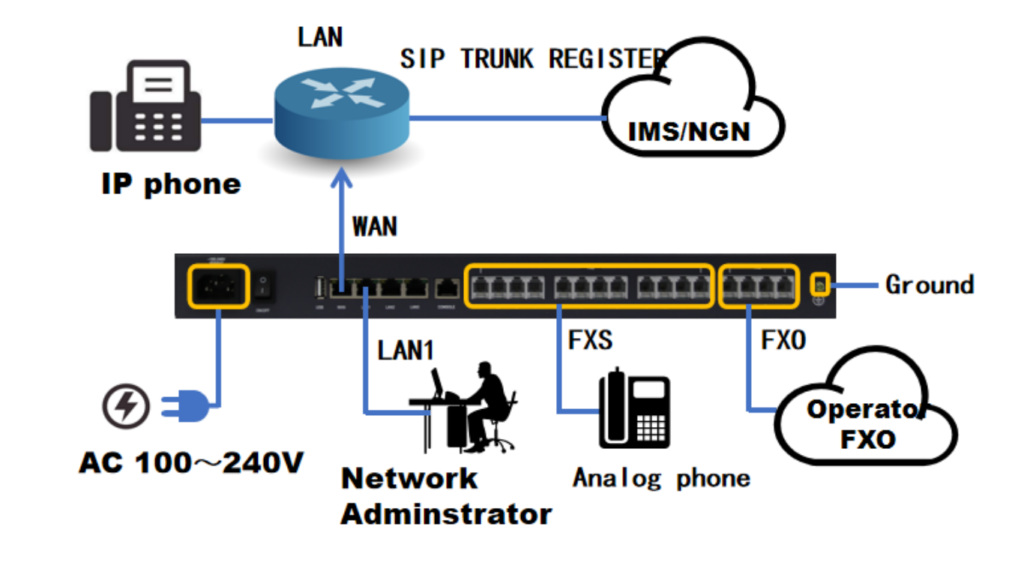
Step 2:Plug and Play
Completely Internet-based design, all communication methods on the Internet to achieve, where there is Internet plug and play, quickly into the work state.

Step 3. Installation Process
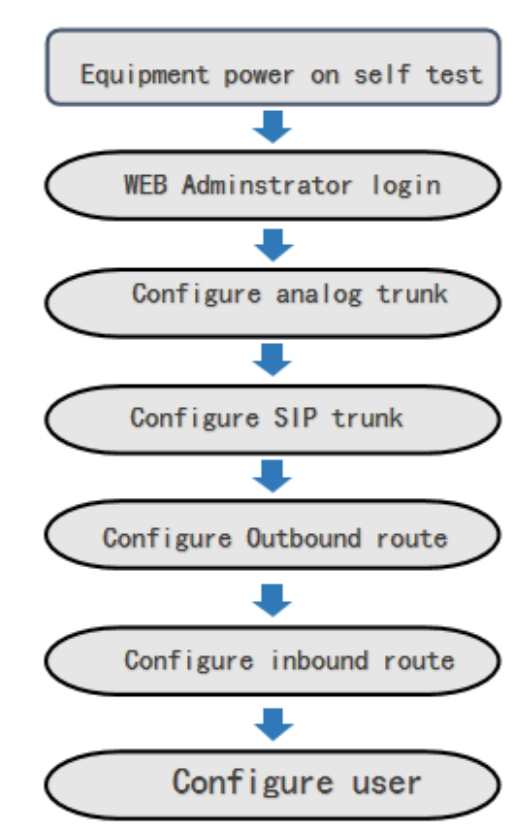
Step 4. WEB Administrator system login
Physical connection: The LAN port of the IPPBX is directly connected to the PC network port;
- The PC network port is configured to automatically obtain the IP address mode or static IP address mode.
- The user launches the browser on the PC. In the address bar enterhttp://192.168.100.1 to login into the WEB network management.
- Select the language Chinese or English to log in.
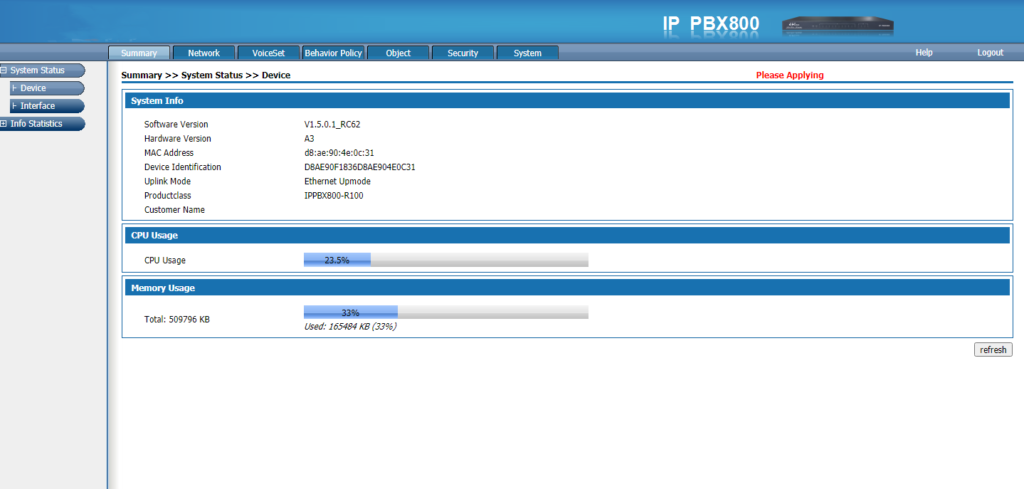
Step 5.Configure Analog Trunk
- Physical connection: FXO port is connected to the operator’s analog exterior line;
- Path: Click Voiceset>Trunks config> trunk config> analog trunk >Add ✓ Select the corresponding FXO port trunk channel.
Step 6.Configure SIP Trunk
- Physical connection: WAN port of the device is connected to the local area network;
- Network setting route: network>basic setting>Wan setup>WAN5
- InterfaceType:
- ①NNI-point-to-point mode
- The extension numbers of the two PBX cannot be repeated, and each manages its own extension number. Two PBX need to create a sip trunk, and the sip trunk fills in the ip address and port number of the other PBX.
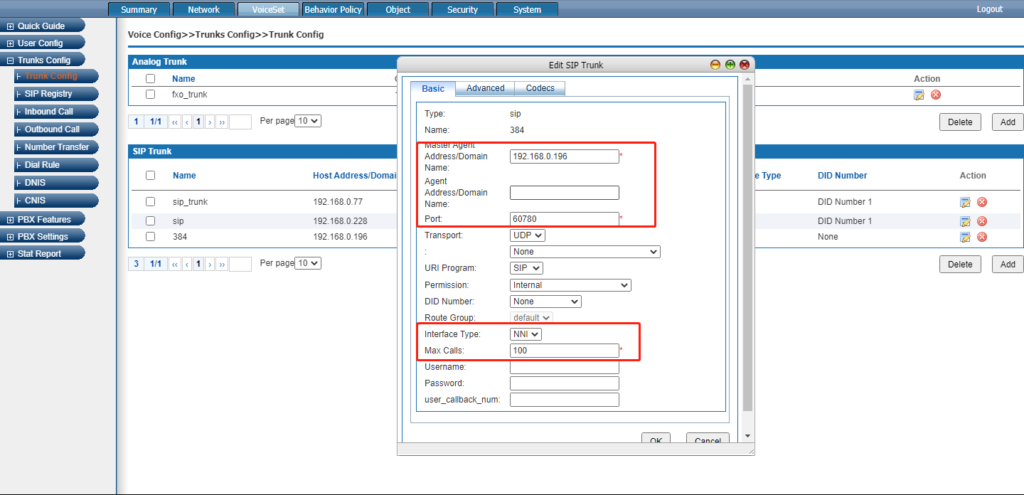
- ②UNI-Register mode
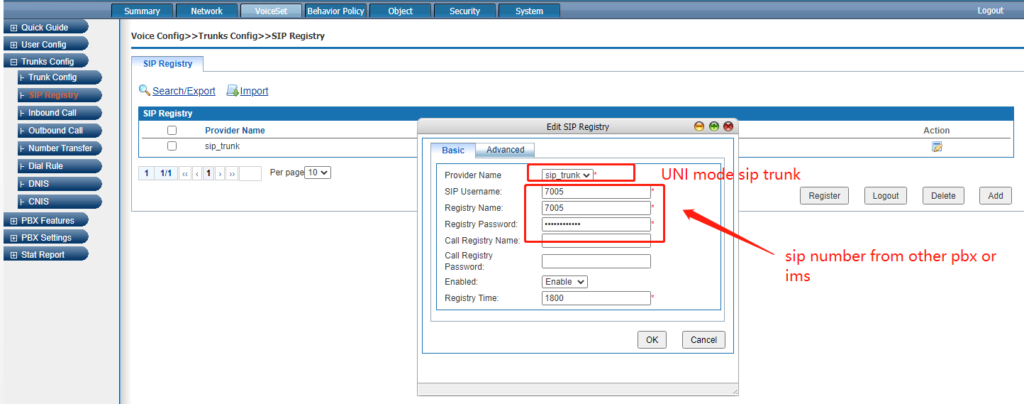
- Our PBX is used as a gateway. Register other PBX sip numbers or register IMS numbers.DID Number select DID Number1 or DID Number 2. You can check on DID setting.
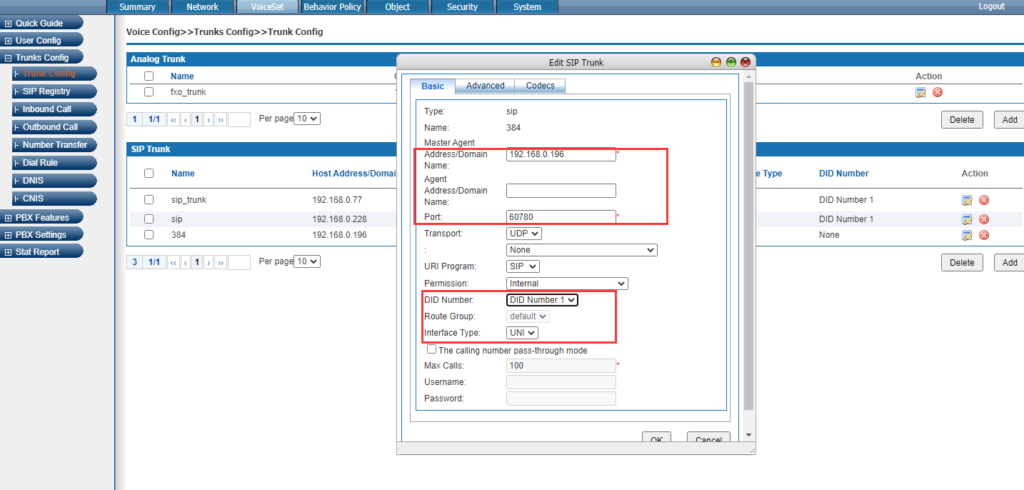
SIP/IMS account register as shown below:
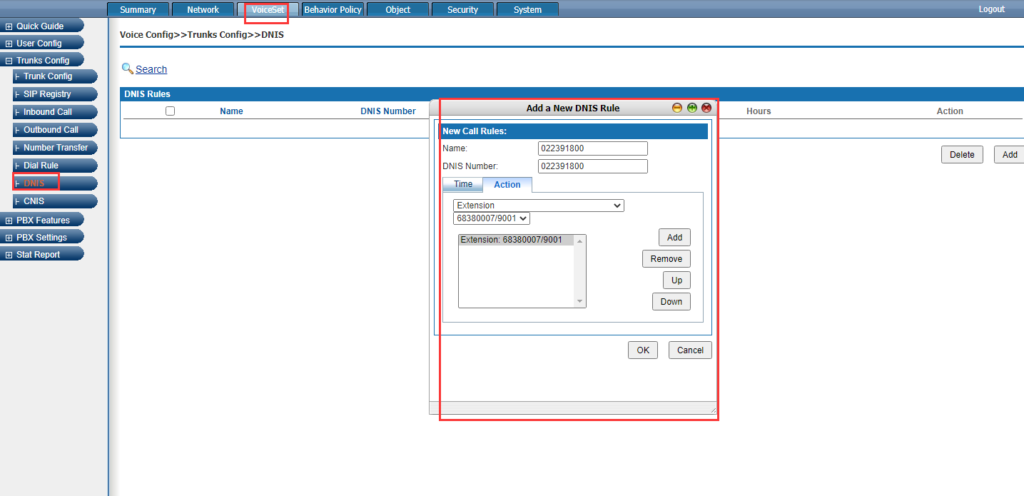
SIP trunk Inbound setting(For UNI mode)
DID number call is detected and proceed to the next action.
Did number is the register number of the last step.
Step 7.Configure outbound call
- Route: Voiceset >Trunks config> Outbound call
- Default setting: Analog trunk outgoing prefix local call:0
- Domestic call:00 International call:000
- SIP trunk local call outgoing prefix:9
- Domestic call outgoing prefix:90
- International call outgoing prefix:900
Step 8. Configure Inbound call
- ①Configure inbound route for analog trunk
- Route: Voiceset>Trunks config>Inbound call
- Click add: inbound call operations can select automatic transfer to extension, IVR, or automatic transfer to an operator. (The transfer priority is higher than the binding FXO channel)
- ②. SIP trunk inbound call :
- Route: Voiceset>User config>Users> fill in DID number
- An extension can bind the incoming and outgoing calls of the SIP relay account by filling in the DID number 1. One SIP account corresponds to one extension. If one SIP account is used for multiple extensions, the incoming call will not take effect, and the incoming call can only be configured with the DNIS rule
- Route:Voiceset>Trunks config>DNIS
- Fill in: DNIS number( SIP trunk register user name), the incoming operation can be transferred to extension/IVR/Queue/Hang up/Conference/Wait/ etc(Priority is higher than DID number1 ).
Step 9. Configure user extension
- Route: Voiceset > users config>user> click search/export
- Batch modifies type: FXS user name, FXS channel, permission, user account, extension number, etc.
- Tips: When registry of analog or SIP users, remember to check the term enable extension setting, SIP USER NAME, extension number, and registry account must be the same. The primary registry password of the sip user is Aa111111, Permitted Registry Address Range: not checked this term. And also pay attention to the user’s permission for the extension.
How to configure your IP Phone
Quickly configure the phone, through the phone LCD screen and the phone keyboard panel, you can configure and use the phone functions. After checking the IP address of the phone, you can also enter the IP address of the phone in the browser to view all the functions of the phone, and configure it through the browser. If there is no computer around, you can use your smartphone to scan the QR code provided by the phone for configuration.
3 ways of IP phone configuration
- Step 1. Phone LCD Configuration
Enter the menu through the menu soft keys, you can configure basic settings (language, ringtones, etc.), and configure advanced settings (account, network, etc.), enter the advanced settings need to enter the administrator password, the initial administrator password of T780 is admin.
Phone standby interface:
Step 2.Web interface configuration
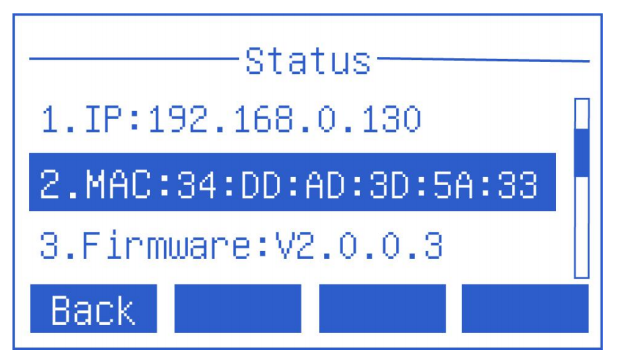
- How to view the IP address (IPv4 or IPv6) of the phone:
- 1. Press IP Phone the “OK” button.
- 2. Press the menu soft key -> to enter the status option.

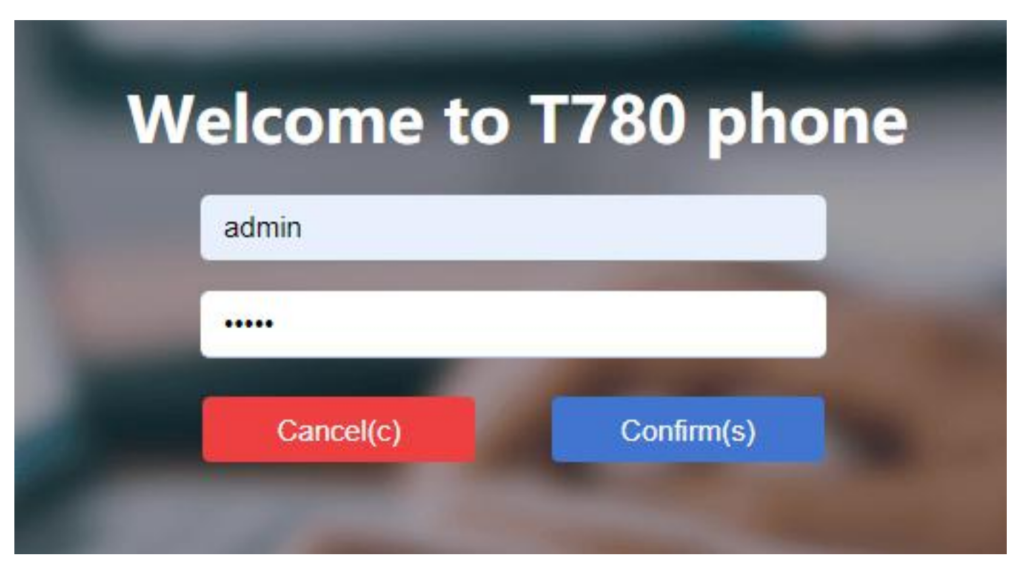
Computer browser interface to view
- 1. Open the browser.
- 2. Enter the IP address of the phone (IPv4 /IPv6),192.168.0.103.
- 3. Enter the phone login page, enter the account and password to log in, and the initial account and password are (admin/admin).
Note: IP phones can be set up in three network modes: IPv4, IPv6, IPv4, and IPv6.
Step 3. Mobile phone scan code configuration
Get the phone’s QR code through the phone’s QR code function. Before scanning, the smartphone needs to be connected to the WIFI of the same network as the phone before you can use the smartphone to scan the QR code to access the phone’s management page.


